Monday, November 29, 2010

Christmas Past

Memories of Christmas past:
This is sort of a guest post...except the guest has no idea I'm posting it...
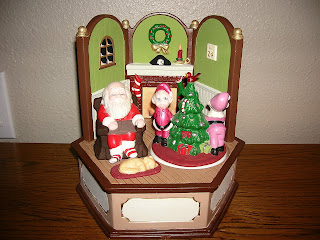
This piece has always held a special place in my Christmas memories.  My Mom is very talented with chalk and paint.  Look at the glow of the fire, ahhhh....
I updated the wall colors and some other things just to keep it fresh and not outdated.  My girls enjoy the elves dancing around the Christmas tree as much as I did at their age.  The music box plays "Chestnuts roasting on an open fire" as the tree and elves turn in time.


Saturday, November 20, 2010

Free Christmas: Puzzle blocks

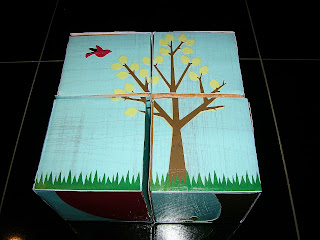
These puzzle blocks turned out way better than I expected (what a relief!  Most of the projects I've been doing lately have completely fallen apart).


Oops!  I put this one together wrong (o:  These are harder than they look!


Free Christmas: Checkerboard

Thomas made this out of 2 cuts of a - 1x6.  I painted it up and then put hinges on it.
I thought it turned out cute!


Free Christmas: Medical kit - Ear, nose throat light

Free Christmas:  Medical kit - ENT light

Thomas designed and built this little beauty.  It turned out great!
You can even see through it!


Free Christmas: Medical kit - Stethoscope

Free Christmas: Medical kit - Stethoscope

I used the stem of a huge gerber daisy I had lying around for the top part.  I made it so it doesn't go in the ears (that's just gross for kid toys).  It goes over the ears like glasses.


Friday, November 19, 2010

Thanksgiving guest soaps

I found the cutest idea at http://thegreenbeanscrafterole.blogspot.com/2010/11/leaf-water-soap.html for Thanksgiving or fall gift ideas.  These will be perfect for the guests at Thanksgiving!

What you need: 
Plastic leaves (I got mine at Hobby lobby at 80% off)
Melt and pour soap (I used glycerin soap)
Essential or fragrance oils
Wax paper
Tweezers


I pealed the leaves off of the veins on their backs first.  After melting your soap and add desired fragrance or essential oils, use tweezers to dip leaves in soap (careful - it's hot!) and lay leaves on wax paper to cool.
Once the soap has hardened, they're ready to package!

Just wash your hands and throw the leaf away!
I love having the leaf in the soap because it helps clean the dirt off my girls' hands better.


She also has the CUTEST Thanksgiving conversation coasters at her etsy shop!


Tuesday, November 9, 2010

Free Christmas: Hair clip holders

Free Christmas:  Hair clip holders

I got my inspiration for these from here:  http://www.theidearoom.net/2009/07/girls-barettes-and-hair-bow-holder.html  (Her project is much cuter than mine)  I believe she used an 11x14 frame.  I didn't have one on hand so I used 2 8x10 frames instead - I have lots of 8x10 frames for some reason.
These aren't very little-girly, but since they need to hang in my hallway, they need to match my decor. 


The flower in the middle was my first flower from my first dance (which was in college - how sad is that?) I pressed and framed it. It turned out cute!


Here's what I used.  Pretty simple to figure out!


Saturday, November 6, 2010

Free Christmas: Picture wheels

Free Christmas:  Lady bug picture changing wheels


Free Christmas: Medical kit - Head lamp

Free Christmas:  Medical kit - Ear, Nose, Throat Head Lamp
I found a mini CD in my things and thought it would make the perfect head lamp!  I sewed a washer to a strip of elastic and then glued the CD to the washer.  I cut out paper circles and covered them in...you guessed it!  Super sparkly glitter!

Thursday, November 4, 2010

Free Christmas: Medical kit - Bandage tin

Medical kit:  Bandage tin
Bandage tin made from a chocolate covered mint tin.  The edges are brown (hard to see in pic).  I sanded the edges of my pink paper then mod podged it after gluing it to the lid of the tin.

Wednesday, November 3, 2010

Free Christmas: Shopping cart

My Mom bought me a metal cart with wheels to organize scrap booking stuff (sorry Mom!) and it turned out to be the makings of a cute little shopping cart!

I removed the top two shelves and bent the side down for the handle.  I sawed the other side off with a hack saw and attached the top lower down.  The bows are covering the seams from little fingers.  I bent the baskets that I removed and fastened them to the sides making the cart deeper.  I used ribbons for a spot to put their baby.

All-in-all, I'm pretty happy with how it turned out (o:


Here's the "Before" shot.

Free Christmas: Medical kit - blood pressure cuff

Faith has always been interested in doctoring things and I've always wanted to get her a medical kit....play medical kits are expensive.  Today I thought about making a kit, but I was SURE the items wouldn't turn out.  Much to my delight, this little blood pressure cuff turned out really great!  I am SO happy with it!


I decided to use a cloth napkin I had hanging around for the cuff.  I measured my girls' arms and cut it out accordingly.  I sewed Velcro on the spots that fit my girls and then folded it in half.  I inserted a rope between the fabric and sewed it all shut. ( I have an AMAZING sewing machine passed down to me from my Great-Grandmother.  The thing sews through everything!)  I filled a balloon with corn starch and tied it to the end of the rope.  The balloon ended up just the right amount of "squishy" and I can't get it away from my husband's hands!  It's like a stress relieving ball.

Christmas for FREE!!!!!!!!!

So, this year for Christmas, we are COMPLETELY broke.....Can I just tell you, I have REALLY had the time of my life coming up with Christmas for free!  What a scream!  I can't get enough of this - I am amazed at how easy it is to come up with really great gifts from things I already have around the house!  Thomas offered to spend a little money if I needed it, but I am having so much fun seeing if I can actually do it with NO money at all!  The trick is to stay away from the stores and the cute Christmas things that tempt me.

I will be posting all of our gifts as I crank them out.  Wish me luck!

I made these butterfly wands yesterday.  I got the idea from: http://thegreenbeanscrafterole.blogspot.com/2010/07/flitter-flutter.html
I used the Cricut Serenade cartridge to cut out 2 butterflies per wand.  I cut them out at 3" and scored them along the body of the butterfly so the wings would bend out a little.  You could even try curling the wings if you wanted to. 

Walmart sells dowels in packages that are under a dollar (o:  I had some on hand and glued a butterfly to the front and a butterfly to the back top with tacky glue.  I believe glue dots would work as well. 

If I couldn't find dowels, I would use strait sticks from our tree or anything I had around that would work for a wand. 

I painted designs on them with a small paintbrush and some glue.  Add a little glitter and voila!  Perfect fairy princess wands for FREE!

The picture doesn't do the glitter justice.  I have the SPARKLIEST glitter ever.....sigh.  Sparkles make my heart sing!