Monday, December 5, 2011

All Rahel


Rahel has really been through the ringer these past few months.  She is such a trooper!  In her prayers, she would ask Heavenly Father to make it her owie day so she could eat some Jell-0.  So sweet (o:

Rahel got a left ear drum in September.  Yay!


Cutest fro EVER!


Seizure testing


Okay.  Who looks this beautiful in a head bandage?!?  Would you just look at her?  Sigh...


We found her sleeping with her face in her "frowup" bowl


Rahel got a Right ear drum last week!  We are SO blessed.
The coloring is WAY off in this picture.  She isn't at all this pale.


We love our sweet baby doll (o:

Our Trip to Heber Valley


As many of you know, Thomas and I were going through some rocky times and decided to separate.  I don't think there are words to describe my happiness now as we are a complete family once again.  For our Anniversary this year, Thomas took me to the Zermat in Midway where we enjoyed swimming in the "crater" - a cave with a deep natural spring inside.  The water was warm and clear.  Scuba diving classes were being held while we swam around and enjoyed the warm water. 

We ate probably 4 gelattos between the two of us (o: and the BEST brick oven pizza we have EVER encountered at a small place in Midway.  We ate alot of amazing food and enjoyed resting by the fire in our suite.  We really had a wonderful time.

The view out the window in our suite was like a dream (for me anyway :) - there was a field with cows and an old house that the cows frequented while we were there.  The house even had it's beam for tieing up your horse still.  I LOVE old buildings.  It was just begining to snow and the stream that cut through the field steamed a little.  The Mountains were beautiful behind it all.  It was like looking at a live painting.  I enjoyed sitting out on my balcony in the crisp cold air watching the cows and the snow.  I felt so spoiled! 

On our last night there, we boarded the Heber Valley Railroad to enjoy their Comedy Murder Mystery.  It was fun, the food was good and it was COLD!  The heaters didn't put off much heat.  Right before the 3rd act, the train broke down.  Yes, it's true.  The heaters stopped working when we broke down (of course) so we all ended up piling into one car.  We were practically on eachothers laps for an hour until a new engine came for us.  We were only about 3 miles from the station, so nobody was particularly worried except maybe the actors (o:  They seemed to take it the hardest.  We really had a good time.  Who can say they broke down on a 1930's train during a murder mystery?  How cool is that?....literally...

On Sunday, we attended a local ward and enjoyed driving around Midway and Heber.  What a dreamy place to live!


Thursday, November 3, 2011

A bit of randomness!


Thomas went in to check on the girls and found Faith asleep like this (o:


Rahel cleaned my sink for me - what a doll!


Faith "wrapped" a bag of half-eaten cheetos for Thomas (o:  She even colored and cut out a bow for it.  So cute!

Halloween fun


Dollar store skeleton necklaces


A tutu, Pink gems for eyes and a ring, and a pink bow = cute girly balerinas!


Saturday, October 15, 2011

My Super Awesome Vintage Typewriter


Introducing....My Very Own Super Awesome Vintage Typewriter!  It's Vintage, It's Grey, It's functional and best of all, It's MINE!  I found it at the thrift store for $6.00!  It looks awesome in my craft room and the girls LOVE playing around with it.  For $6.00, who can complain? 


Friday, October 14, 2011

Job Draw


The girls really enjoy competing for the biggest pile of finished chores.  Mom really loves that the jobs get done!  I just used clear glass drops from the dollar store.  You can get them at any craft store in the floral section.  I used diamond glaze to glue on colored circles I cut out of cardstock and wrote the chores on. 


For the pouch, I used clear plastic from Walmart in the fabric section where you can buy vinyl and tablecloth-type material.  Find some cute fabric and sew it to the plastic.  Super cute!


There are also number glass drops that are smaller.  Those are the number of items to pick up in their bedroom.


Thursday, October 13, 2011

Clay Typewriter Key Magnets


These fun little magnets turned out cute!  I love having Alphabet magnets for the girls to play with, but I hate the way most alphabet magnets look.  These fulfill both of our needs (o:  I just rolled out white oven bake clay to about 1/2" and used a perfume lid to cut them into circles.  They look like typewriter keys!  Just stamp letters on them with black ink and bake them.  Super easy and super cute (o:


Tuesday, October 11, 2011

Calm Down Jar


This cute Time Out idea was on Pinterest and I decided I must make one!

All I did was fill up a pint jar with water, 1 drop of blue food coloring and some glitter.  I have whichever kid is "doing time" shake the bottle and watch it settle.  Once the glitter has settled, they've had time to calm down and talk about their problem.  It's quite soothing actually (o: 

Saturday, October 8, 2011

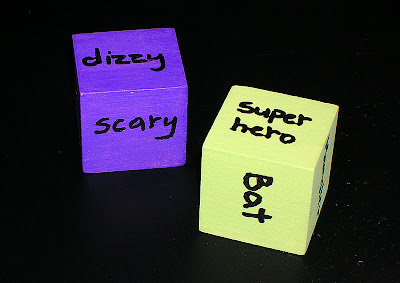
Emotion game blocks and a Halloween spin on the game


I'm not sure where I found the idea for this game. 
So Much FUN!!!
On the first 1" block you've painted, write in 6 emotions with permanent marker.  Those of you with kids know how well they relate with animals (o:  On the second block, write in 6 different animals. 
There are fun twists on this game too.  Why stick to animals?  Try robot, alien, princess, tractor, etc.


Here is a Halloween version of the game:
Feelings:  Dizzy, Scary, Crazy, Sleepy, Grumpy, Silly
"Animals":  Witch, Bat, Ghost, Monster, Cat, Super Hero

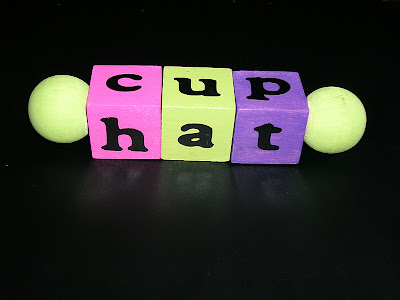
Spelling block toy


I loved this cute idea by countingcoconuts for cute little spelling toys.  They're so easy and so cute!
I used 1" wood blocks from Hobby Lobby (don't forget your 40% off coupon!) and trimmed a dowel to stick out the ends just enough to fit and glue on the end wood balls.  Paint the blocks and balls before assembling and gluing.  I used vinyl letters, but I don't recommend it.  The kids just pick them off, so writing them on with a permanent marker would be more practical.

Go over to countingcoconuts for a much more informative tutorial if you're interested in making these.  She has some really great educational ideas for the kiddos.

block one: b, c, h, m
block two: a, e, o, u
block three: d, g, p, t

Wednesday, September 28, 2011

Making General Conference Memorable

Conference is this weekend!  Is everybody prepared?  Are you having trouble coming up with good ideas to keep your kids involved?  I love coming up with traditions for my family.  Here are some great ideas to incorporate into your own family traditions at conference time!  I'm so excited to try some of them out (o:

Halloween Skeleton fence


This would make a cute centerpiece with a haunted house in the middle or a huge pumpkin etc.


Home Depot gives paint stir sticks for free - I tried to pay but they wouldn't take my money. 
You'll need quite a few....like 30.  I cut the bones out on my cricut and used black paper to add a shadow.  I reccomend using the cheapest $1 spray paint from Walmart.  It looks more rustic. 


The paint job doesn't need to be perfect because most of them will be covered with bones on one side.
My husband cut most of the sticks down for the cross bars of the fence.  We used wood glue to assemble the fence and actually added some hinges so that it could fold up and be used in multiple ways.


I'm linking up to A little Tipsy's DIY under $5 and Lil' Luna

Easy Halloween kid craft


Aren't these the CUTEST ghosts ever?!?  My friend Angie made these while watching my girls!  What a fun and easy project!  My girls LOVE crafting and I LOVE these cute ghosts! 

Monday, September 26, 2011

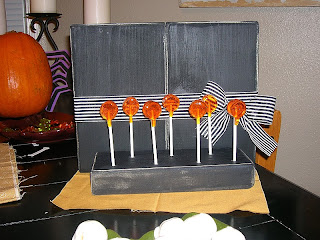
Sucker display


I had the mister make these sucker stands for me the night before last years Halloween party and my nieces painted them up with chalkboard paint. I'm so happy with the way they turned out! I made these teeny suckers to display.


Wednesday, September 21, 2011

Fall wreath


Here's a great DIY fall wreath that will cost around $5.00
I started with a piece of cardboard cut into a square.  Paint your cardboard ( I didn't and wish I had) a fall color.  I hot glued dollar store fall leaves to cover the front.  The wreath is super light, super cute and super cheap!
Last year, that is all I did to my wreath.  This year, I cut a foam pumpkin from Michaels' 50% off bin in half and glued it to some brown paper (burlap would look way cute too - I just didn't have any) and taped it to the back of the wreath.  I really like the way it turned out.  If you don't want to do the pumpkin, it should cost only $4.00!


Friday, September 16, 2011

Temple block


I am in LOVE with the way my new temple blocks turned out!  They're way easy and way cute!  I used a scrap chunk of board, painted it black and roughed up the edges.  Mod-podge worked great for glueing the picture on.  I find if you use a roller to do your top layer of Mod-podge, you get a more professional looking texture.  Sometimes I'll just use a spounge brush and tap it on after applying the glue - same result as a roller.  I put a small finial on top and a small candlestick on the bottom with e-6000.  My inspiration comes from Lil' Luna who offers these BEAUTIFUL pictures of so many different temples distressed for FREE!  I also drew inspiration from Shanty2Chic.


Wednesday, September 14, 2011

Salt Lake Temple print


I found this great foam board backed print at D.I. for 75 cents!  My Dad and I made a frame for it using baseboard.  It's super lightweight and looks awesome in my dining room!  Hooray for D.I.!!!

Back to school routines and an upcycle pencil tube


Well, we're back into the swing of things and these little routines help SO much.  Rahel can't read yet so I just made them both with pictures.  The girls love marking off the items as they accomplish them.  I had them laminated so crayon can wipe off easily.  If they accomplish their routine each day, they can mark one of the boxes on the right.  If they finish all five boxes at the right, they get to choose a book from D.I. and earn a dollar.  They love it so far...


I couldn't fit the box of colored pencils into Faith's pencil box, so I used a paper towel roll and taped one end shut.  I hot-glued ribbon around the tube and glued a strip of stripey ribbon to hide the seam.  It fits perfectly and doesn't need a lid.  Faith LOVES it.  She's my artsy fartsy girl (o: